Introduction -
In the world of technology, most of the organisations and companies are upgrading their application infrastructures for better availability and low maintenance while developing and supporting the application.
Technical teams are breaking their monolithic giant application into small services which can develop and deploy independently. In simple language these small services are generally referred as microservices.
Here we will focus on practical knowledge and develop our first microservice. we will be using java and spring boot framework to develop and run our service. Next step will be to test and access our service with Advance Rest client.
Here we go...
Prerequisite -
- Zeal for learning
- Basic Java Programming
- Eclipse
- Maven
- Advance Rest Client
We will go step by step and see how things move and eventually becomes so easy to understand microservice concept.
Installation & Setup -
Step 1- Install Eclipse ( ~already installed then move to Step 2)
You can download eclipse from eclipse foundation website. Download Eclipse. Just ensure you downloaded eclipse package as per your machine configuration and java package is there to do java programming.
Step 2 - Download and configure maven eclipse plugin.
Most Eclipse downloads include the Maven tooling already. If it is
missing in your installation, you can install it via the main update of your
release via Help ->Install New Software.
Step 3- Download Advance Rest Client
Visit URL and download Rest client to test our microservice. Surely we will have to develop microservice to test first then only we can use this tool :)
There are multiple ways to create spring boot application in java.
a. Spring Initializr Website - Create project structure, download and import in eclipse.
b. Maven project and add spring parent pom and boot starters manually in pom.
c. Spring CLI or Tool suite etc.
We will follow here as maven project and add boot starters manually. In this way we don't need go outside with our local setup and we can see the impact when we add starters manually. this is important to understand background activities and impacts of spring boot starters.
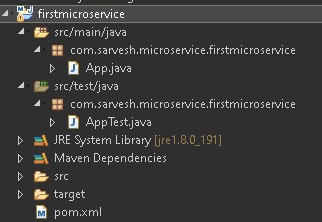
1. Create java maven project like below.
3. Add spring boot parent in pom.xml
<parent>
<groupId>org.springframework.boot</groupId>
<artifactId>spring-boot-starter-parent</artifactId>
<version>2.2.1.RELEASE</version>
</parent>
4. Add spring web boot starter in dependencies as we are creating rest services.
<dependency>
<groupId>org.springframework.boot</groupId>
<artifactId>spring-boot-starter-web</artifactId>
</dependency>
We can see multiple jars are downloaded in maven dependencies. it means each boot is bundle of jars to provide particular types of features.
For example, web boot is responsible for web application or services similarly security boot is responsible for creating security of application. With the help of these boots, programmers don't need to add each and every dependencies manually. These boot packages will makes life easy.
Let's start programming to build spring boot application.
Make below changes in App.java class. just two line change and your application is ready to run as spring boot microservice app.
@SpringBootApplication // line 1
public class App {
public static void main(String[] args) {
SpringApplication.run(App.class, args); //line 2
}
}
When we run App class as java application, you will see below logs on console.
Let's design API URI for our microservice. Design APIs in such a way which help end users to understand the purpose of service. Always things as noun.
1. Add Controller.
package com.sarvesh.microservice.firstmicroservice.controller;
import java.net.URI;
import java.util.List;
import org.springframework.beans.factory.annotation.Autowired;
import org.springframework.http.HttpStatus;
import org.springframework.http.ResponseEntity;
import org.springframework.web.bind.annotation.DeleteMapping;
import org.springframework.web.bind.annotation.GetMapping;
import org.springframework.web.bind.annotation.PathVariable;
import org.springframework.web.bind.annotation.PostMapping;
import org.springframework.web.bind.annotation.PutMapping;
import org.springframework.web.bind.annotation.RequestBody;
import org.springframework.web.bind.annotation.RestController;
import org.springframework.web.servlet.support.ServletUriComponentsBuilder;
import com.sarvesh.microservice.firstmicroservice.data.ToDoDataObject;
import com.sarvesh.microservice.firstmicroservice.services.ToDoAppService;
@RestController
public class ToDoAppController {
@Autowired
private ToDoAppService appService;
@GetMapping("/todos")
public List<ToDoDataObject> getAllToDos() {
return appService.getAllToDos();
}
@GetMapping("/todos/{id}")
public ToDoDataObject getToDo(@PathVariable long id) {
return appService.findByUId(id);
}
@DeleteMapping("/todos/{id}")
public ResponseEntity<Void> deleteToDo(@PathVariable long id) {
ToDoDataObject dataObject = appService.deleteToDo(id);
if (dataObject != null) {
return ResponseEntity.noContent().build();
}
return ResponseEntity.notFound().build();
}
@PutMapping("/todos/{id}")
public ResponseEntity<ToDoDataObject> updateToDo(@PathVariable long id,
@RequestBody ToDoDataObject todo) {
if (todo == null) {
return ResponseEntity.noContent().build();
}
ToDoDataObject dataObject = appService.save(todo);
return new ResponseEntity<ToDoDataObject>(dataObject, HttpStatus.OK);
}
@PostMapping("/todos")
public ResponseEntity<Void> saveToDo(@RequestBody ToDoDataObject todo) {
if (todo == null) {
return ResponseEntity.noContent().build();
}
ToDoDataObject dataObject = appService.save(todo);
URI uri = ServletUriComponentsBuilder.fromCurrentRequest().path("{id}").buildAndExpand(dataObject.getId())
.toUri();
return ResponseEntity.created(uri).build();
}
}
2. Add service to store data in memory.
package com.sarvesh.microservice.firstmicroservice.services;
import java.util.ArrayList;
import java.util.Date;
import java.util.List;
import org.springframework.stereotype.Service;
import com.sarvesh.microservice.firstmicroservice.data.ToDoDataObject;
@Service
public class ToDoAppService {
private static List<ToDoDataObject> todos = new ArrayList<ToDoDataObject>();
private static long idCounter=0;
static {
todos.add(new ToDoDataObject(++idCounter, "Spring Boot Learn", new Date(), false));
todos.add(new ToDoDataObject(++idCounter, "React Learn", new Date(), false));
}
public List<ToDoDataObject> getAllToDos(){
return todos;
}
public ToDoDataObject save(ToDoDataObject dataObject) {
if(dataObject.getId()==-1) {
dataObject.setId(++idCounter);
todos.add(dataObject);
}else {
deleteToDo(dataObject.getId());
todos.add(dataObject);
}
return dataObject;
}
public ToDoDataObject deleteToDo(long id) {
ToDoDataObject dataObject = findByUId(id);
if(null==dataObject) {
return null;
}else {
todos.remove(dataObject);
}
return dataObject;
}
public ToDoDataObject findByUId(long id) {
for(ToDoDataObject dataObject : todos) {
if(dataObject.getId()==id) {
return dataObject;
}
}
return null;
}
}
// 3. Add data object class
package com.sarvesh.microservice.firstmicroservice.data;
import java.util.Date;
public class ToDoDataObject {
private Long id;
private String task;
private Date targetDate;
public ToDoDataObject() {
super();
}
public ToDoDataObject(Long id, String task, Date targetDate, boolean done) {
super();
this.id = id;
this.task = task;
this.targetDate = targetDate;
this.done = done;
}
private boolean done;
public Long getId() {
return id;
}
public void setId(Long id) {
this.id = id;
}
public String getTask() {
return task;
}
public void setTask(String task) {
this.task = task;
}
public Date getTargetDate() {
return targetDate;
}
public void setTargetDate(Date targetDate) {
this.targetDate = targetDate;
}
public boolean isDone() {
return done;
}
public void setDone(boolean done) {
this.done = done;
}
@Override
public int hashCode() {
final int prime = 31;
int result = 1;
result = prime * result + (int) (id ^ (id >>> 32));
return result;
}
@Override
public boolean equals(Object obj) {
if (this == obj)
return true;
if (obj == null)
return false;
if (getClass() != obj.getClass())
return false;
ToDoDataObject other = (ToDoDataObject) obj;
if (id != other.id)
return false;
return true;
}
}
Above code is just simple code and can be easily understood what we are doing. we are created code for our designed APIs.
When we launch the application. it will be start on 8080 port.
Testing -
Launch advanced Rest Clint tool to test our services.
You can download full running code from GIT repository and import in your eclipse.
Please comment and let me know in case any compilation error or issue while running this application.
Happy Learning!!!!!
.


No comments:
Post a Comment