![]() https://www.facebook.com/techaddaa/
https://www.facebook.com/techaddaa/
Hey Friends,
This is third post in microservice blog. This series is specially designed to learn microservices and various aspect of that in programming world.
Introduction -
BDD is a way for software teams to work that closes the gap between business people and technical people by:
- Encouraging collaboration across roles to build shared understanding of the problem to be solved
- Working in rapid, small iterations to increase feedback and the flow of value
- Producing system documentation that is automatically checked against the system’s behaviour
Prerequisite -
- Part 2 - https://sarveshoza.blogspot.com/2020/07/springbootdatabaseh2.html
- Cucumber for java plugin in eclipse/Intellij IDE.
- Zeal for learning.
In software engineering, behaviour-driven development (BDD) is an Agile software development process that encourages collaboration among developers, QA and non-technical or business participants in a software project.It encourages teams to use conversation and concrete examples to formalize a shared understanding of how the application should behave
Three Amigos as the Core Idea of Behaviour Driven Development
The core idea in behaviour driven design is that no one person or field has the full answer to anything.

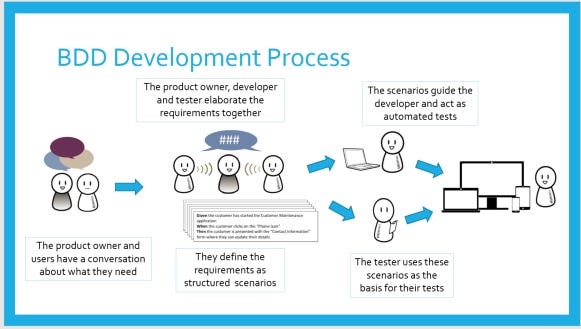
Essentially, day-to-day BDD activity is a three-step, iterative process:
- First, Create User Story for new change in system and also list some common examples of the new functionality.
- Next, document those examples in a way that can be automated, and check for agreement.
- Finally, implement the behaviour described by each documented example, starting with an automated test to guide the development of the code.
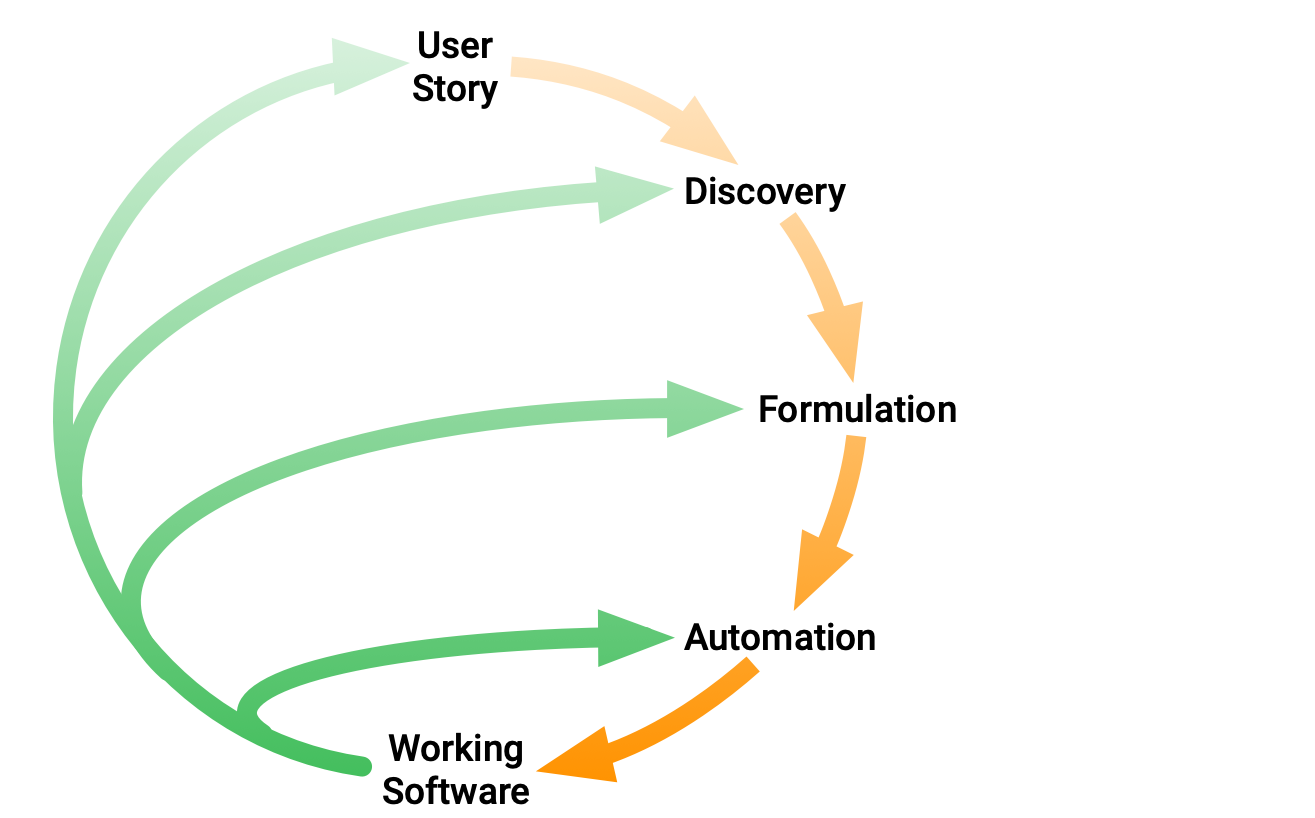
Three phases of BDD are:
- Discovery. This is where you explore a story in a structured conversation. It has two aims. One is to ensure the story’ll contribute to business outcomes. For example with the Five Whys method. The other aim is to ensure shared understanding of what is required by outlining concrete examples of specific scenarios.
- Formulation. This is where you rephrase (formulate) the examples in a structured language and turn them into executable specifications. These follow the given-when-then pattern:
- the scenario (given)—the initial state, for example ‘the user is logged in’,
- the event (when)—what happens, for example ‘the user presses the logout button’, and
- the outcome (then)—the expected response, for example ‘the login page is shown’.
- Automation. This is where you turn the executable specifications into automated acceptance tests. Using tools like Cucumber, this is a matter of connecting the tool to the software.
Implementation -
Feature Files: A file with extension '.feature' is called Feature. A feature file contains a Feature. And feature always starts with 'Feature' keyword in the feature file and it contains one or more scenarios.
We have ready made microservice developed in previous post. Link is available in Prerequisite section.
In this post, we will write some cucumber base scenarios in feature file and see how we can automate testing of our microservice.
As we know formulation phase is important where we write feature or behaviour in structural way.
lets take any example of our microserice and try to write few scenario.
As our TODO microservice is created on TODO domain object so we will write scenarios on that only. Todo is just simple domain having three properties.
- Long id , String task , Date targetDate.
Feature: First feature file
  Scenario: add new todo
    Given todo task 'BDD Learning' targetDate '2020-09-03'
    When creating TODO
    Then TODOs list should contain newly crated TODO


  Scenario: search an todo
    Given todo id 1
    When search in application
    Then result should return 'BDD Learning' Todo
This feature file is provided by BA or product owners team.
Lets see what changes we need to do in existing project to test these scenarios and automate microservice with cucumber.
Step 1 - Download cucumber plugin of IDE (Cucumber for java).
We can also download cucumber for java plugin from marketplace of eclipse IDE or plugins in Intellij IDE.
Step 2 -
Change in pom.xml
Add below additional dependencies in pom.xml
<!-- Cucumber dependencies-->
<dependency>
   <groupId>org.springframework.boot</groupId>
   <artifactId>spring-boot-starter-test</artifactId>
</dependency>

<dependency>
   <groupId>io.cucumber</groupId>
   <artifactId>cucumber-java</artifactId>
   <version>6.6.0</version>
   <scope>test</scope>
</dependency>

<dependency>
   <groupId>io.cucumber</groupId>
   <artifactId>cucumber-spring</artifactId>
   <version>6.6.0</version>
</dependency>

<dependency>
   <groupId>io.cucumber</groupId>
   <artifactId>cucumber-junit</artifactId>
   <version>6.6.0</version>
</dependency>
Step 3 - Write feature file under test/java/resource/feature
name - toto.feature
Feature: First feature file
  Scenario: add new todo
    Given todo task 'BDD Learning' targetDate '2020-09-03'
    When creating TODO
    Then TODOs list should contain newly crated TODO


  Scenario: search an todo
    Given todo id 1
    When search in application
    Then result should return 'BDD Learning' Todo
Step 4 - Create CucumberRun.java class
This class will be main configuration class to run feature scenario as junit test cases.
package com.sarvesh.microservice.firstmicroservice.bdd;

import io.cucumber.junit.Cucumber;
import io.cucumber.junit.CucumberOptions;
import io.cucumber.spring.CucumberContextConfiguration;
import org.junit.runner.RunWith;
import org.springframework.boot.test.context.SpringBootTest;

@RunWith(Cucumber.class)
@CucumberOptions(features = "classpath:features", plugin = {"pretty", "json:target/cucumber-report.json"})
@SpringBootTest(webEnvironment = SpringBootTest.WebEnvironment.DEFINED_PORT)
@CucumberContextConfiguration
public class CucumberRun {
}
@RunWith(Cucumber.class) - Run this class with cucumber feature file.
This will execute all scenarios in same package as the runner, by default glue code is also assumed to be in the same package.
The @CucumberOptions can be used to provide additional configuration to the runner.
@CucumberOptions(features = "classpath:features", plugin = {"pretty", "json:target/cucumber-report.json"})
This indicate Runner will reads all scenarios from features folder at classpath and start execution and generate json report.
@SpringBootTest(webEnvironment = SpringBootTest.WebEnvironment.DEFINED_PORT)
Spring Boot provides a @SpringBootTest annotation which can be used as an alternative to the standard spring-test @ContextConfiguration annotation when you need Spring Boot features. The annotation works by creating the ApplicationContext used in your tests via SpringApplication
MOCK - Loads a WebApplicationContext and provides a mock servlet environment. Embedded servlet containers are not started when using this annotation. If servlet APIs are not on your classpath this mode will transparently fallback to creating a regular non-web ApplicationContext. Can be used in conjunction with @AutoConfigureMockMvc for MockMvc-based testing of your application.
RANDOM_PORT - Loads an EmbeddedWebApplicationContext and provides a real servlet environment. Embedded servlet containers are started and listening on a random port.
DEFINED_PORT - Loads an EmbeddedWebApplicationContext and provides a real servlet environment. Embedded servlet containers are started and listening on a defined port (i.e from your application.properties or on the default port 8080).
NONE - Loads an ApplicationContext using SpringApplication but does not provide any servlet environment (mock or otherwise).
Step 5 -
Generate step definition for feature file (glue code).
IDE cucumber plugin will help to generate steps definition. Right click and create steps definition file.
package com.sarvesh.microservice.firstmicroservice.bdd;

import com.sarvesh.microservice.firstmicroservice.data.ToDoDataObject;
import io.cucumber.java.en.Given;
import io.cucumber.java.en.Then;
import io.cucumber.java.en.When;
import org.junit.Assert;
import org.springframework.boot.web.server.LocalServerPort;
import org.springframework.web.client.RestTemplate;

import java.sql.Date;

public class TodoStepdefs {

    @LocalServerPort
    protected int port;

    protected final String SERVER_URL = "http://localhost";
    protected final String API = "/todos";

    protected RestTemplate restTemplate = new RestTemplate();

    ToDoDataObject toDoDataObject = null;
    int status  = 0;
    int searchId  = 0;

    private String apiEndpoint() {
        return SERVER_URL + ":" + port + API;
    }

    @Given("todo task {string}, targetDate {string}")
    public void todoTaskBDDLearningTargetDate(String task, String targetDate) {
        toDoDataObject = new ToDoDataObject();
        toDoDataObject.setTargetDate(Date.valueOf(targetDate));
        toDoDataObject.setTask(task);
        toDoDataObject.setDone(false);
    }

    @When("creating TODO")
    public void creatingTODO() {
       status =  restTemplate.postForEntity(apiEndpoint(), toDoDataObject,ToDoDataObject.class).getStatusCodeValue();
    }

    @Then("TODOs list should contain newly crated TODO")
    public void todosListShouldContainNewlyCratedTODO() {
        Assert.assertEquals(status, 201);
    }

    @Given("todo id {int}")
    public void todo_id(Integer int1) {
        searchId = int1;
    }

    @When("search in application")
    public void search_in_application() {
        String searchApi = apiEndpoint()+"/"+searchId;
        toDoDataObject = restTemplate.getForEntity(searchApi,ToDoDataObject.class).getBody();
    }
    @Then("result should return {string} Todo")
    public void result_should_return_todo(String string) {
        Assert.assertEquals(string, toDoDataObject.getTask());
    }


}
For each when , given and then, we will have blank method in class. i have edit file and updated code as per our feature file.
It is simple and straight forward and in case any doubts, feel free to post on our facebook page or group. We will discuss and understand in details.
To run this there are multiple ways are there -
a. As junit - you can right click on CucumberRun.javaand run as junit.
b. As cucumber feature file - Create run profile for feature file and select main class as "io.cucumber.core.cli.Mainio.cucumber.core.cli.Main".
c. As Maven - run maven test phase it will run all the scenario.
mvn test
we can see below output on console
2 Scenarios (2 passed)
6 Steps (6 passed)
0m22.063s
Source code available at GitHub -
https://github.com/sarveshoza/firstmicroservice/tree/springbootcucumberbasic
Bonus Points -
Cucumber vs Selenium vs ALM
In this section, we will study the difference between Cucumber, Selenium and ALM.

Upcoming Posts -
We will have more fun and learning in upcoming weeks. Bookmark this space in your favourites.
1. Spring boot security starter
2. Spring batch
You can also suggest your favourite topics in comments section or on Facebook page. We will try to start exploring on those topic. You can also suggest points to make blogs more effective.
To connect more and discuss technology, Please visit and like the page. We will list all the posts there and provide updates about upcoming events/posts.

No comments:
Post a Comment